The Wedding!

So it happened – I am a married woman, a wifey! I remember a few years back saying to my mom, “I’m never going to get married, that’s not my thing”…but here I am, now a Mrs. And it feels pretty good! 🙂

Now I know y’all want pictures, so here they are – all have been taken by the AMAZING Jodie King of Jodie King Photography. I could never have imagined anyone else taking my wedding pictures. And she did not disappoint, as usual!

20140217-143114.jpg20140217-143139.jpg20140217-143155.jpg20140217-143208.jpg20140217-143335.jpg20140217-143346.jpg20140217-143526.jpg20140217-143546.jpg20140217-143617.jpg20140217-143642.jpg20140217-143715.jpg20140217-143745.jpg20140217-143847.jpg20140217-143931.jpg20140217-144042.jpg20140217-144056.jpg20140217-144106.jpg20140217-144116.jpg20140217-144127.jpg20140217-144142.jpg20140217-144153.jpg20140217-144209.jpg20140217-144221.jpg20140217-144235.jpg20140217-144249.jpg20140217-144326.jpg20140217-144342.jpg20140217-144359.jpg20140217-144412.jpg20140217-144424.jpg20140217-144437.jpg20140217-144719.jpg20140217-144728.jpg20140217-144740.jpg20140217-144752.jpg20140217-144805.jpg20140217-144819.jpg20140217-144835.jpg20140217-144846.jpg20140217-144902.jpg20140217-144938.jpg20140217-144956.jpg20140217-145012.jpg20140217-145025.jpg20140217-145044.jpg20140217-145107.jpg20140217-145122.jpg20140217-145138.jpg20140217-145206.jpg20140217-145340.jpg20140217-145448.jpg20140217-145724.jpg20140217-145824.jpg20140217-145848.jpg

20140217-145924.jpg

20140217-145946.jpg

20140217-145959.jpg

So what do y’all think?! We had a great time and everyone got along swimmingly. None of us wanted to leave because we were drinking, dancing, and having a ton of laughs. My girl Nicole (in the red dress) flew all the way out from California to be my maid of honour – it wouldn’t have been the same without her or Jodie there, they are the best! Alex’s dad was the best man and my mom walked me down the aisle. We had a small wedding with only 11 people, but it was great 🙂

We are having a bigger party this Sunday, and my girl Jodie will be there taking more pictures. And you’d better believe I will be posting pictures of that as well 🙂

Review: Style Me Vintage: Step-by-Step Retro Look Book

20121107-135647.jpg

A little over a week ago, I received an email from the lovely Amelia of IPG about whether I would like to review the upcoming book, Style Me Vintage: Step-by-Tep Retro Look Book. Of course, how could I say no to that?!

Some of you may be familiar with this series, as they have a few books out already. This is a meshing of all of them, which is great for anyone looking for a wonderful all-around foundation to begin your retro, vintage, pinup, or rockabilly style. This guide can help take you from know-nothing novice to a savvy shopper. Mind you, this is not the be all or end all, nor are other books – there are just some things you have to learn and experience yourself based on your body shape and a number of other factours.

Now, when I do reviews, I like to give full disclosure on what I received. My disclosure is this: I have the Style Me Vintage: Hair book that I bought about a year ago, and upon inspection, it seems to be very alike, like this picture tells:

20121107-131258.jpg

The top book is just for the hair and the bottom is this book I am reviewing. I just felt the need to let everyone know about this, so there are no surprises when you receive your book.

The makeup section if this book is fabulous. As a makeup artist, a lot of tricks and tips are put into this section that will help many women to achieve their best looks.

You can go from a Marilyn Monroe look here:

20121107-131748.jpg

To an eighties Madonna or an extreme Siouxie Sioux look as seen here:

20121107-131925.jpg

20121107-132007.jpg

They provide a variety of looks, starting from a 1920s Clara Bow all the way to the 1980s Madonna look and everything in between. Also, in the back of this book there are more beauty tips about how to get the perfect manicure, including the famous ’40s half moon look, as well as getting your brows perfect and nailing false eyelashes and the cat eye look. All of it is explained very well, and helps you to achieve the best look you can.

My absolute favourite part of the book is all about the clothing. If you were to buy this book, just the clothing section alone is well worth the price! It goes through each decade from the twenties through to the eighties, and lists the must have day and night looks and staples of the period. A history of each period is given to explain and rationalize why the fashion was the way it was during that time. Included in each section are amazing tips to help boost your period look, and some definitions of things you may see in the book or have heard of before, such as what a bias cut is.

This section has incredibly useful extras including a whole portion on shape wear and underwear as well as swimsuits of different periods. The most helpful are the sections dedicated to how to make easy repairs to damaged items, from tears, washing, stains, drying, and storage. This is so important for any vintage lover to know, so you can keep your fabulous frocks in the best shape and to help them get even better if need be.

There is also a great section about how to get into vintage clothes. I know this may sound ridiculous to some, but there are different ways to put on different items without tearing them or thinking they don’t fit when in actuality they will but just need to be put on correctly. This will help so many gals get into those amazing and to die for dresses without being disappointed that they can’t get in it when all it needs is a little battle planning! It also includes a “vintage shopping necessity kit” that you should always bring when shopping, such as a tape measure and a wide belt. It also guides you on how to properly inspect items for any flaws and how to get chummy with the sales people to get the first dibs on good items. Another area is a quickie list on how to date vintage, which is helpful to know that what you are pining for is indeed a fifties frock and not an eighties knockoff.

20121107-134127.jpg

I found this book to be quite an amazing addition to my collection, and is something I will surely go back to reference from time to time. The layout of the book is gorgeous, as is the cover with its vintage inspired fabric cover. I read this in its entirety, and it just has a wealth of fabulous facts and information on every page that I think will serve all of my readers on numerous levels, from the beginner to the more advanced. It is gorgeous to look at, put together well, and will serve as your go-to reference book quite often!

Style Me Vintage: Step-by-Step Retro Look Book is available for $29.95 (US) or $32.95 (CAN) November 2012 at bookstores everywhere or through Trafalgar Square Publishing. This book is also available on Amazon as well.

Do yourself a favour and go for it – it will be worth it, I assure you 🙂

Bomber Betty Cosmetics: A Review

20120824-183627.jpg

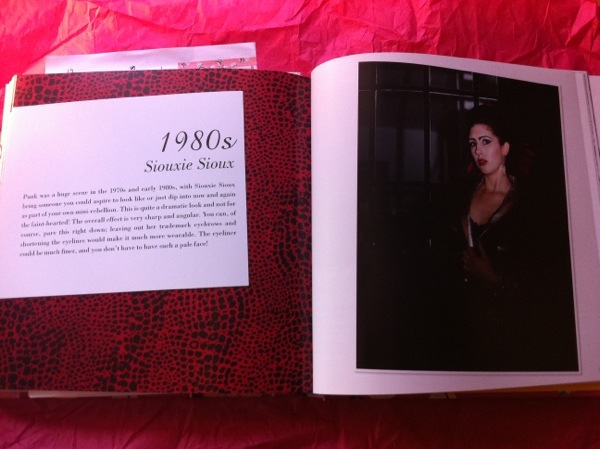
I recently heard of a new up-and-coming cosmetics company called Bomber Betty Cosmetics. The owner, Jessica Sawicki, is a Chicago-based makeup artist who has taken her craft to a whole new level with her own brand of mineral based makeup she makes herself that has a vintage, World War II, and rockabilly vibe all rolled into one.

Here is what is written on her site:

Why, hand-made mineral cosmetics of course! Chicago area makeup artist, Jessica Sawicki, does things the old fashioned way. She creates and hand packages her own line of lipstick, lip gloss, foundation, blush and concealer colors from the finest mineral ingredients available. Her products are natural, paraben-free and cruelty-free, so you can shop with a clear conscience.

I recently received a bunch of samples from Jessica, all of which I tested out today before going out for the day.

20120824-171253.jpg

I received three eyeshadows, a blush, a brow filler, a lipstick, and a lip stain, all of which you can see the colours of below.

20120824-175014.jpg

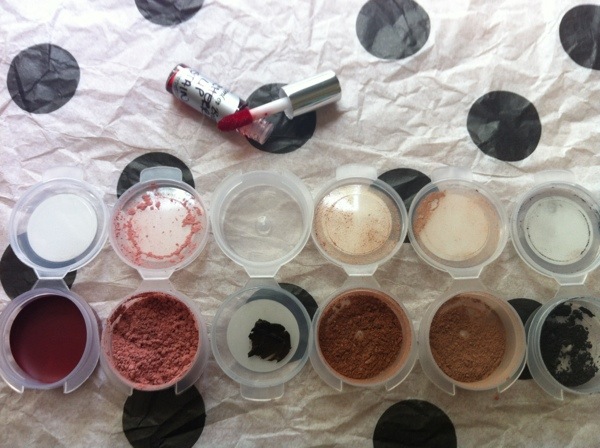
First, I applied the blush, which is shown second from left. It has a pinky peach tone, and offers a rather sheer coverage. I had to use a bit more than you would usually experience with a mineral blush, but that can be a good thing, as you don’t want to look like a Victorian doll (or at least I would hope not).

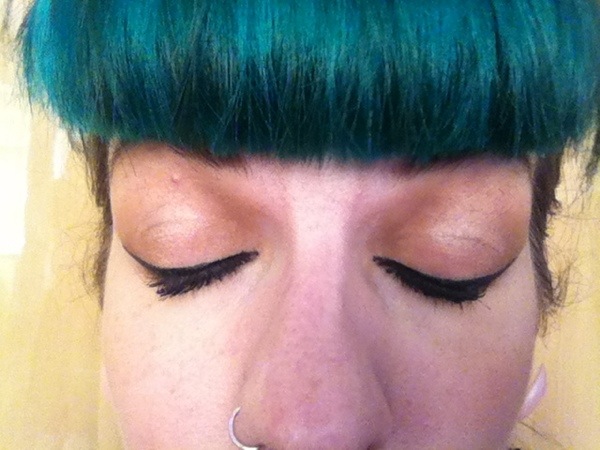
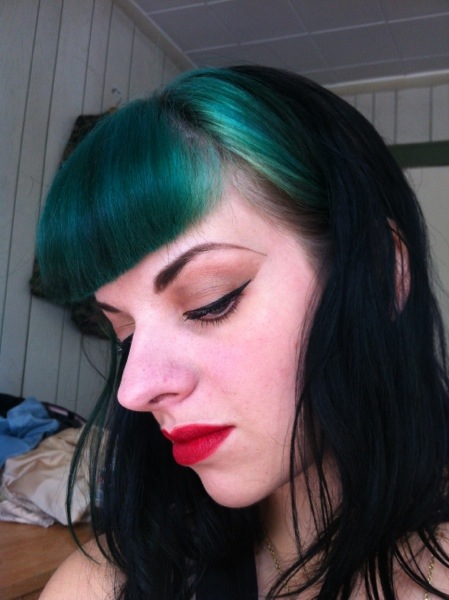
Then it was on to the eyeshadow. I always use an eyeshadow primer, which is Too Face’s Shadow Insurance. I applied Coal (furthest right) first in my crease, then Rose Gold (third in from right) from my brow bone to part of the lid, and finally Malt (second in from right). These are definitely shadows where you only use a sparse amount and it goes a long way. I had applied all I needed to, and it still looked like I hadn’t made a dent in the quantity! Another fabulous quality is that just like the blush, it is very layerable and blends very smoothly. But, please note, that mineral shadows are different from regular shadows, so you don’t need to go hoarding your brush with this stuff.

Next I applied the Julia Brow Wow. This has got to be one of my favourite items that Jessica had sent me. This brow filler has what looks like almost the consistency of a lipstick, but when you put it on it acts like a powder or a pencil. It also makes it look very natural, and not like you painted your brows on. Some like heavier brows, so let me assure you this is also layerable depending on what look you may want to achieve. I like this product so much that I may in fact have to buy this myself and add it to my kit, both professionally and personally!

Here is the after of my eyes:

20120824-180715.jpg

Lastly, I tried both lip products. First, I tried the cherry lip stain. the colour of this may look rather dark initially, but it goes on as a rather sheer, light red, and is great to wear for a daytime look or at the office. My only issue is that it dried out my lips, but then again every lip stain does that, so I would recommend a lip balm or gloss on top to moisturise.

A shot of me wearing the lip stain…

20120824-181212.jpg

Lastly, I tried the Cherry Bomb lipstick. Let me just say, WOW. I have been a Besamé girl for the longest time, and their lipsticks were all I ever used or ever wanted to use. But this lipstick may have changed my mind, or at least made my scope of lipsticks wider. This lipstick colour has a bluish base, which works better on my type skin, and does well for most others as well as make your teeth appear whiter. This lipstick just melted onto my lips like butter, and was so smooth and creamy. It didn’t dry out my lips nor did it really fade a huge amount. This is also another product I will certainly be investing more in, and in more colours!

20120825-130116.jpg

Here is the finished look:

20120824-181851.jpg

20120824-181916.jpg

Today was about a 94 degree day, and more humid than I would like. Being a New Yorker, we tend to walk more than most, and as such I was sweating a bit with the heat (no, sorry – I was glowing 😉 ). After about four hours, I checked up on my makeup upon my return home. I was pleasantly surprised at how well the lipstick stayed, as well as the brow wow and the blush. The eyeshadow did crease a slight bit, but nothing too major to make it look off or like you had nothing on. With hot and humid days like this, you honestly can’t expect your eyeshadow to hold up through all of it. Considering this, I think it performed rather well overall!

After pictures:

20120824-182515.jpg

20120824-182542.jpg

All in all, I would have to give a comprehensive score of an 8 out of 10 for this makeup line. I think it is certainly worth a look at by all of my lovely readers, so please check out her site Bomber Betty Cosmetics!

If you want to try the makeup line out for yourself, you can order three samples and a cute sticker all for a flat cost of $4 (shipping included!). So go ahead, search to your heart’s content, and try some of her samples here. I love to help out small, home-grown businesses with great products.

Disclaimer: I have not been compensated in any way for this review, and it is offered only to help my readers find out about new products and how they perform. I actually paid $4 for three samples and a sticker, and I let Jessica know I am a blogger and I would like to do a review. She was gracious enough to send me some extra samples to try, and here we are! A big thanks to Jessica!

Vintage Adverts from the 1940s

Hi dolls!

Over the past few days I have been looking through some vintage ads from the 1940s, and I must say, they are rather interesting. I chose a few of my favourites to share with you, with some commentary to go with.

20120226-182818.jpg

Notice all of the colour options? Red, red, and more red! That was de rigeur for the time, though. The shade differences were rather slight, but each had their own place for skin tones and day or evening wear.

20120226-184410.jpg

I like how this ad caters to all of the different uniforms that were worn during the war. I was in the military, so I am familiar with how anal retentive the dress codes and restrictions are 😉

20120226-184604.jpg

I chose this ad just because of this having Rita Hayworth in it. Having celebrities in cosmetics ads is still very common today, just look at Beyoncé and Eva Longoria in L’Oréal ads.

20120226-184950.jpg

A soda ad again with Ms. Betty Grable. She looks great here, just beautiful.

20120226-185131.jpg

I think this ad is a great showcase for how makeup was like back in the ’40s. Mascara came in a little rectangular box, with an area that the mascara itself came in, and a little brush to dip it in and apply it. You can see how it was packaged in the lower corner.

20120226-190414.jpg

I personally love cold cream, and I try to always use it to help remove my makeup at night before I actually wash my face. I use Pond’s. The reason I use it? Because that’s what ladies back in the ’40s did 🙂

20120226-192018.jpg

It was very common during the war to see ads specifically targeted to women who were serving. Being in the service back then was a lot different than it is now (although us ladies still cannot be in infantry or artillery positions), and women were expected to look a certain way and wear makeup a certain way. I saw an old WWII ad that catered to women in the Marine Corps that their lipstick shade will match the red in their chevrons in their service uniforms. I thought that was pretty funny, but was the time back then.

20120226-192719.jpg

Classic pinup girl in a classic cigarette advert. ‘Nuff said.

20120226-193136.jpg

I love this ad, but kind of hate it too. I like that it is sentimental, but I don’t like that it almost blackmails you because of it! Oh well, it was a war, any help was good help.

20120226-193622.jpg

I like this ad as well. I like how it has the American soldier, fighting for his country, and seeing that Coca Cola sign and thinking of back home, and what he is fighting for. It’s also effective for the home front as well I think because it reminds people that their boys are fighting for them, and that they can honour them and feel closer to them by having one.

What ads have you seen from the ’40s that have stuck in your mind?

Necessary Tools for Great Vintage Makeup – Part Two

20120122-114657.jpg

Hi dolls!

Here is part two of my installment on necessary vintage makeup and tools. No introduction needed really, so let’s get started!

White Shadow Pencil

This is great for a lot of reasons. It helps to highlight your brow bone as well as the inner corners of your eyes to give you a more well-rested and awake look. You can also use this pencil to line the inside of your water line (lower lash line) to give you a more wide-eyed look which was very popular amongst Hollywood starlets and pinup girls. I use NYX pencil in Milk.

Rouge/Blush

Of course us vintage loving ladies need some nice colour on our cheeks! There are certain ways to apply rouge to achieve a vintage look based on a specific decade, but in general you blend into your cheekbones, using them as a guide as you blend up and outward toward your hairline. It is preferable to use a rosy or peach red blush for retro looks. I personally use a rouge, which is more of an authentic technique. Once I found Bésame’s rouge, I knew it would be the only one I would ever desire using 🙂

Eyebrow Pencil

I could not write this post and forget something as important as this! You will need to this to create the shape of your brow that you would like to achieve as well as fill in possible sparse areas. Be sure to get a colour that is about a shade lighter than your natural hair colour; getting the same colour as your hair will only make your eyebrows look entirely too severe and take away from your entire look. You will be adding a brow powder later to finish, anyway – so no worries!

Brow Powder

There are companies that have products specifically marketed as “brow powder”, but you don’t need that at all. Have I confused you yet? Well, stay with me on this – such “brow powder” is really nothing more than reassigned eye shadow. Do you have eye shadow in a colour about the same as your brow pencil? Then you are set! Just use your slanted eye brush to fill in your brows with it and to blend everything to a nice beautiful, natural finish.

Liquid Eyeliner

I love liquid eyeliner – it is all I ever really use for lining my eyes. You can create so many looks because of the liner tip (I prefer felt tip), from a thin barely there line to something more dramatic with a cat’s eye wing tip. The only colour you need is – what else – black! I use Maybelline’s Lash Stiletto because the tip is a decent length where you have a lot of versatility and the liner stays on a while, offering nice deep colour. This is essentially for rockabilly looks and to have a nice authentic vintage sex appeal.

Regular Pencil Eyeliner

I sometimes use pencil liner for a more demure look, and more often use some colour when I utilize this option (although of course I still have black as well!). I have navy blue and emerald green to make the colour pop in my eyes, since I have eyes with both colours in them. You can also use pencil liner for day and liquid for evening if you’d prefer.

Lengthening Mascara

Although it was nice to have volume in your lashes, the “gotta have it” quality in your mascara for retro makeup is length, length, length, and more length! I use the lengthening mascara again from Maybelline’s Lash Stilleto line. I also use Lancome’s Hypnôse mascara as well. Long luxurious lashes are something you will see on any Old Hollywood starlet. When you have nice long lashes, your eyes are automatically made bigger and brightened, making your eyes “pop”. Who wouldn’t want that? These ladies had it right! They don’t call it classic for nothing 🙂

False Eyelashes

No respectable starlet went to any event without a nice pair of false eyelashes on. It helps amplify your length as well as volume – the glamour, oh my! I bought a decent box of 6 pairs of Amazon for about $3, so it isn’t difficult to find some decent ones for a good price. I know She Uemera has some nice lashes (some rather, um, interesting…), but they are ridiculously expensive. You don’t need to shell out that type of money, trust me. You are mostly paying for a name there. But be sure to get some decent eyelash glue, please! Duo is the best brand in my personal opinion. You can find their glue at your local drugstore.

Eyelash Curler

Again, this is not something you need to put out big bucks for. They all do the same thing, so grab a cheap one at a local drugstore. I usually curl before and after applying mascara, just for some added oomph. Curl them in a pulsing hold, not a continuous hold – it helps to curl them better. It’s just another way to brighten and blow up those beautiful eyes!

Lip Liner

Since you will now be a lipstick aficionado, you must now also become a lip liner aficionado. This creates a “frame” for the lipstick to stay in, and helps maintain your colour better from fading. Lip liner is also imperative to drawing those lip lines and shapes of the era you desire. Every era from the ’20s through the ’60s had a special lip shape that was en vogue and sexy at the time (I will write a post about this in the near future), and lip liner helps to give you that general shape to fill with your lipstick. I use Bésame’s dual lip liner. I think all y’all know how much I love Bésame, so that’s all I have to say on that 😉

Lipstick

One of the most important parts of your makeup look will be red lipstick. It can intimidate some women, but wearing it just oozes classic sex appeal and confidence. This is an area where I would recommend not being cheap. A good quality red lipstick is very much worth it, and can really make or break your look. Of course, you know what I am going to say here, but it is so true, and it took me forever to find a really great lipstick – Bésame is the gold standard for us vintage loving ladies (and most ladies, it should be!) in terms of lipstick. They have a wide variety of red shades (as well as pinks, corals, browns, et cetera), so you should be able to find at least a couple of shades for you. The colour is very well pigmented and moisturizing, so using a lip brush will get you a little bit to go a long way, which makes the lipstick last forever! And the customer service has been fabulous to me. I know I go on about them (and no, I don’t get paid to plug them!), but honestly they are such a great company with great products – you won’t regret a purchase from them.

Finishing Powder

I never realized how much of a difference this would make until I used it! It really helps to set your makeup in place and soaks up any oil so that you will have a flawless and matte look. Just lightly brush all over your face, and then you are all set with your makeup! I can really notice a difference from when I use it compared to when I don’t.

And that’s about it! I know it may seem like a lot, but when you actually use all of these things, it doesn’t take that long. But it certainly looks fabulous!

In the past few days, with the support of my good friend Bunny Moreno, I have officially decided that I will dip my toes into the YouTube tutorial pool. I have a few ideas floating around in my head as to what my first video (my pilot, I guess you could say…? 😉 ) should be, so hopefully I will narrow it down in the next few days. When I finally do go for it, I will be sure to post it here for all of you to check out!

Necessary Tools for Great Vintage Makeup – Part One

20120119-195843.jpg

Hi dolls – sorry it has been a bit since I wrote last, I have just been ill recently with some sort of stomach bug or flu that has really taken me for a ride. I am finally starting to recover a bit, so numero uno on my to do list was to post for all of my fantastic readers!

Today’s post is the second part of my “Necessities” series – this time all about makeup. There are certain tools and products that are needed to help create an authentic vintage look like we are trying to achieve. Some are obvious; others, not so much. But never fear, that is why I am here! Sit back, relax, and take stock of what you currently own, and make a list of what you need to get.

Ready? Go!

Foundation Perfecting Base

You know how all of your favourite Hollywood starlets always had perfect skin, with seemingly no flaws? A foundation base will smooth out your skin and make it the perfect blank canvas to showcase your gorgeousness in all of its glory. My personal favourite to use is Smashbox’s perfecting base – it has tons of vitamins and minerals to help your skin in the longer term, and I find this base makes for the best results.

Concealer (Skin tone, Green, and Yellow)

Concealer is commonly used, but more often than not, too many people do not know how to properly use it or know the exact colours to use and where. I offered three basic colours for you to use, as I find they are the easiest to use and offer the best results. Yellow is used to cover under eye circles/darkness, and green is used to counter any redness you may have of your skin, as it is opposite of red on the colour wheel and would therefore be rather effective at neutralizing this undesirable tone. I use skin tone colours to cover any blemishes or anything of the like. I use concealers by either Physician’s Formula or NYX.

Liquid Foundation

Foundation is of course necessary, but why liquid, you ask? I prefer liquid to other forms of foundation due to the fact that its liquid-y nature makes it ideal to create more of a silky and airbrushed feel to your skin. Having as near perfect skin as you can is an essential ingredient to the vintage or pinup look. I use Revlon’s ColorStay foundation, because it offers great coverage with a matte finish, and I found a shade that matches my skin – amazing! 😉

Stippling Brush

This is the soulmate to the liquid foundation for flawless, airbrushed skin. You may scoff at the idea of a brush mattering that much, but trust me – beauty artists know the differences a brush can make! There is a certain way to use it to create that airbrushed effect through, where you speedily dab/dot the brush all over your face with the foundation on it until everything is blended in and no visible lines are showing. There are many tutorials on YouTube about how to properly “stipple”. I use a brush by a company called bdellium.

Eyeshadow Base

Don’t you hate those creases you get only a few hours after you put your eyeshadow on? Or are you having problems being able to blend or have any decent colour appear from your shadow? My prescription for you is some good eyeshadow base. Not only will it even out the natural colour of your lids (from veins, darker spots, et cetera), but it will get your shadow to work at its maximum level as well as stay put all day. Be sure to gently dab/pat it all over your eyelid, and keep your eyes closed for a minute or so to ensure it dries properly and completely. If not, then there was no point to even applying the base. I have oily lids, so without a base my shadow will last a maximum of maybe 45 minutes before almost entirely creased and smudged. I recommend Urban Decay’s Primer Potion.

Eyeshadow Palette

Every girl needs some choices. We like to have these choices 24/7, so it goes with makeup as well. That is why I believe every vintage going girl needs a good makeup palette that offers something for every mood and whim. I personally have two palettes, not just for my business, but also because I love myself some variety too! You can find tons of decent palettes on Amazon, which is where both of mine are from. They also have blushes, concealers, glosses, and more in them. I have the Coastal Scents’ 78 Palette (which is what I would recommend to start with) and NYX’s Beauty Box, although that is really for my business.

Makeup Brush Set

In the final check on the list for today’s partial post, I could not properly execute any of my makeup looks without a good brush in my hand, really. As I had mentioned beforehand in regards to the stippling foundation brush (I separated the two because 99.9% of brush sets do not include a stippling brush), brushes can make a big difference in helping you to achieve the looks you desire. Not all brushes are created equal. MAC brushes are the status quo for good brushes, but there are other good ones out there that I have found to be of nearly the same quality and much less pricey. I have a 13 piece brush set from Shany Cosmetics that I ordered from Amazon for less than $20 or $25. Brushes that I would not budge on requiring are: concealer brush, lash/brow brush, eyeliner brush (very thin tip), slanted eyeliner brush (angled shape – I use this for applying brow powder), blush brush, blending eyeshadow brush (bigger in that it seems as if the bristles are a bit bigger/more plentiful), regular eyeshadow brush (precision work, such as adding shadow in the crease), and a powder brush. Be sure to clean your brushes every week! Help them to help you.

Part Two of this post will be up as soon as possible, so keep your eyes peeled!

Bésame!

I recently ordered from a company called Bésame cosmetics about 10 days ago. I purchased a full size lipstick called “Bésame Red”, as well as a sampler set of lipsticks that I can play around with and see what I like and what looks good on me. It was supposedly shipped out on 18 October, but I had not received anything a week later, and it was shipped via UPS. So yesterday I sent an e-mail to them asking what had happened, and I got a very prompt response from a woman named Fergie. She told me she filed a claim for a lost package, and she will be sending out another package that day to me. She was an immense help; the customer service alone is worth buying from this company!

So far, I have to give the products 5 out of 5 stars. The lipstick is very creamy and packs a lot of colour for only using a bit of it. I only tried one of the colours from the sampler so far, it’s called “Red Velvet”. It’s a perfect shade for work or everyday! I love it so far. It stays on pretty decent too, even despite my ravenous soda habit. It even came with a little card in the sampler that describes each colour and what it would be good to wear it for:

Sampler Card

I can not wait to use all of the colurs, I’m so excited to finally have them! I have heard great things about them, especially from vintage fanatics like moi. Just the packaging alone is worth it! It’s very glamourous and detailed, and will definitely make you feel like a 1940s starlet. How can you go wrong?