Vote for My Next Bettie Bang Hair Colour!

Hello hello to all my lovely readers. I have really been trying to force myself to write a bunch of posts lately and take some snaps of my huge thrifting trip (yet again, I know) yesterday but I have just been feeling as low as your can nearly get because I do believe I am coming down with the flu that has been going around. Lucky me! And ironic indeed as well as just my luck, as I was unable to receive a flu shot recently because I was taking a special steroid for the pinched nerve/herniated disc in my neck and getting vaccines during the course of that treatment is a no-no. So I missed out and intended to get one this week, but here we are. What impeccable timing.

Anywhos, on to the topic at hand – hair! I have been itching to yet again change my hair colour on my Bettie bangs and am just torn between two wonderful colours. Since I just cannot bring myself to a decision, I am opening up that decision to you! I have entered a poll below for all of you to easily vote on what colour you would think would look best and prefer to see next on my Bettie bangs. I have the black hair besides so keep that in mind too!

Here are the options:

Atomic Turquoise

Atomic Turquoise

Hot Pink

Hot Pink

Go for it and let me know.

Thank you all for your help!

Easy Breezy Beautiful ’40s Half Moon Nails

I apologize for being missing in action for a bit, I just got my cat spayed and I feel like such a bad furbaby mommy! I know it’s the best for them, but it’s just hard to see my little stinky in a cone collar and all cut into having had surgery 😦 I am trying to make sure she just relaxes and rests so she can not rip open her incision and heal. I let her sleep where she wants, and I have been giving her special treats to eat, and I still feel bad! LOL.

20121112-170324.jpg

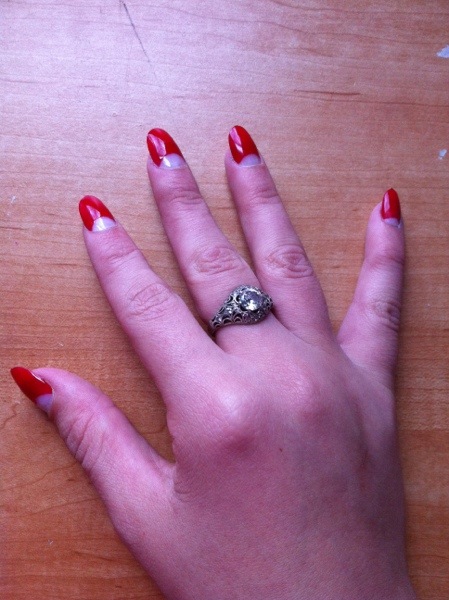
I decided it was high time for a tutorial! I figured out a great way to do my nails in the gorgeous 1940s half moon style that so many of us love. Since this look does not look so swell on short nails, I haven’t been able to pull it off on my natural nails that just decide to say a big screw you and break off before they get any longer than about 2-3 millimeters. So I figured out a way to get the look without the natural length, and to have it look professionally done (without the price!).

Lets see what we are dealing with here:

20121112-171242.jpg

Looks great, huh?!

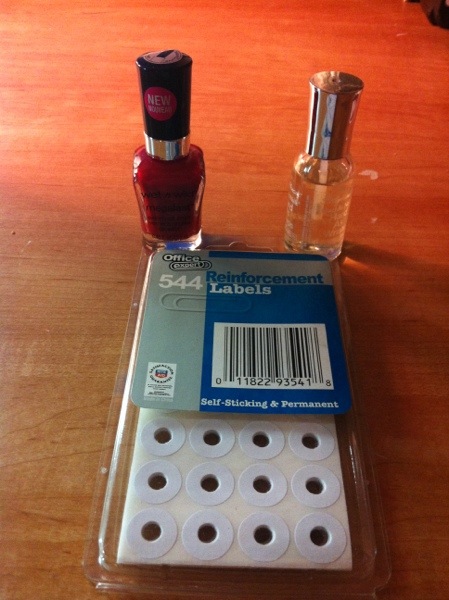
Here is what you need to get started:

-Undecorated full cover glue on nail kit (There is a Kiss brand available at most drug stores like CVS that offers a good rounded vintage-like shape, see below)
-Red nail polish (or colour of your choice)
-Top coat polish
-Hole punch reinforcer stickers (see below)
-Nail file
-Nail glue

20121112-172514.jpg

20121112-172647.jpg

1. Open your nail kit and measure each nail size to yours for an adequate fit. Place them to the side.

2. Take out your reinforcers and attach them to the bottom of each nail, taking in account for each nail’s size and what size of half moon looks proper. Each nail should look like this:

20121113-121702.jpg

3. Take your red nail polish and start painting each nail, just going slightly below the sticker line but never touching further below. When you paint, start with a soaked brush from the middle and then work out to each side – this helps the polish to look even.

Your nail(s) should look like this:

20121113-122647.jpg

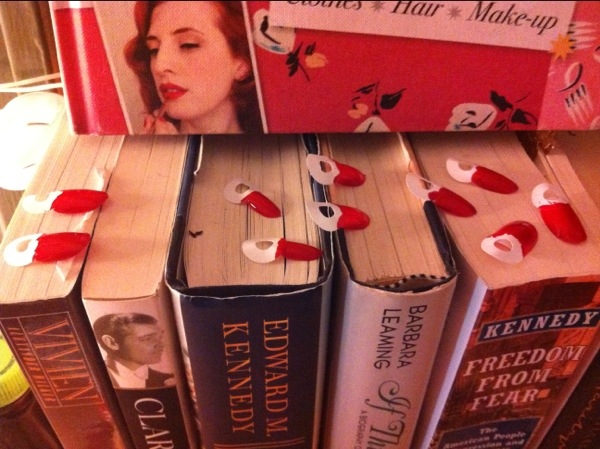
4. After you have completed this step on each nail, put them off to the side in a place that they will not be disturbed and let them cool for at least an hour or two. The drier, the better. I waited six hours with mine. The beauty is they are not on your nails yet so you don’t have to be terrified of fudging them up!

I put mine on top of some books I had on my desk so my cat wouldn’t get them:

20121113-123115.jpg

After waiting a proper time…

5. Make sure your nails are DRY. You are going to be taking the stickers off now, and any residual tackiness will mess up the half moon you are looking to achieve.

When you are taking the stickers off, be sure to pull them off from the bottom of the nail up to the top, NOT from side to side. This allows for a cleaner line.

6. Take another bunch of reinforcement stickers and put them on the back of the nail just like they were on the front, like this:

20121113-123635.jpg

7. Hold your nails by the sticker as I have done in the last pic. Take your top coat now and start putting it on top of each nail just like when you put the polish on. After you are done, return them to their drying place for another couple of hours.

8. Check to make sure the nails are completely dry after a few hours. If they are, take the reinforcement stickers off of them. Get your nail glue and begin to glue them on, applying the glue to the back of the nail and sliding it down to the base so it gets adequately bonded and covered to your nail.

After you have finished that, then you are really finished! They look pretty good huh? I intend to do this on most of my manicures now, and my nail kit comes with 10 sets of nails, so I have 9 more to work on 😉

I hope this works as well for you as it did for me!

To Dye For

Are you looking to add some spunk to your hair? So am I!

For the past few months, I have been putting all sorts of strange colours in my hair, and I love it. I have gotten nothing but amazing compliments since I started, and I relish being so unique and apart from the others. At first I went subtle with two strips of red in the under layers of my hair; but now I have graduated to the full show, dying my bangs and the adjacent strips of hair turquoise. I am proud to be totally different from anyone around, and to stand out in such a unique and individual way.

But how do I get my hair my teal colour? Today is the day I spill my secrets!

Dying your hair a unique shade can be a bit laborious, but the results are stunning. You need to bleach your hair at least once, if not twice. If you do need to bleach twice, please space out the time and deep condition after each time. I dyed my hair a platinum blonde in 2010 and I bleached it twice in the span of a few hours. Needless to say, my hair was breaking off in clumps! But if you remember to space it out and deep condition afterwards, you’ll be golden (literally). Learn from my mistake!

Also, you may encounter some brassiness, which is common. In order to avoid this, I recommend using a product called Red Gold Corrector Plus by Ardell. They have a powder form as well as the drops, which I use. When you deposit it into the bleach, make sure you get it to be a eggplant purple colour. And NO, it will not dye your hair purple! If you look at the colour wheel, you will notice that yellow/orange is exactly opposite of purple – the purple then helps to cancel out these tones. There is a science behind all of it!

Also, make sure you do your research when you pick up your developer. I use a 40 developer, since most of the hair I bleach is near my roots and healthy with no colour, and I can bleach it once and be good to go. However, if you have damaged or dry hair, I would go with the lowest level developer as possible. I would say to ask your stylist or a knowledgable worker at your local beauty supply store for help deciding which level you should go with. I also just dye a section of my hair not only for the cool look of it, but also to not have all of my hair fried to bits! Keeping it at small sections like I do minimizes damage to your entire hair.

After allowing your freshly bleached hair to dry, next is to apply your Adore hair colour. I have used Adore on my hair since I started putting unnatural colours in it, and it is a fabulous dye that lasts a long time before needing a touch up. It is also vegetable based, so it is great for rehydrating your hair after the bleaching; my hair is always silky soft after using this dye. And they have quite the range of colours as well!

20120924-163330.jpg

20120924-163715.jpg

They have even more colours besides these! I currently am using 112 Aquamarine, which is a rather self descriptive name LOL.

What you need to do is apply the dye rather generously, and wrap the hair soaking in dye with plastic of some sort. I have used saran wrap as well as plastic shopping bags for this, so there is no need to go on an all out hunt for some professional wrap. The directions say to let it sit for 15 minutes and use heat, but since this is a vegetable dye you can leave it longer. I leave it for about 30 to 45 minutes, and I blow dry it for about 10 minutes. After that, just wash out (no shampoo or conditioner), and you are set!

Your hair will have a great vibrant colour for a good while. I went two plus months before I needed to reapply, and even then it wasn’t horribly faded. Adore costs about $4 in beauty supply stores (not at Sally’s), and the amount will last for a while as well. It is a great investment for some great looking hair!

Dressing for Your Skintone

Ever notice how great you look in one colour but not another? Is there one colour that whenever you wear it you get noticed and complimented more? There’s a reason that is so: certain colours look best with your skintone. But how is a girl to know? Well I’m here to tell you!

The most important thing to knowing what colours look best on you is what type of skin tone you have. The best way to go about this is to look at the inside of your wrist – if your veins have a bluish tint, you have a “cooler” skin tone; if your veins have more of a green tint, then you have a “warmer” skin tone. Also, if you have a pinkish base or undertone to your skin, then you are cool also. A warm skin tone tends to have a yellow undertone. These are the basics you need to know in order to find colours that look best on you. There are also sub divisions being spring, summer, autumn, and winter tones which we will cover. Once you figure out your tone, look for it below and read on!

Winter Tones

20120831-130838.jpg

I have a winter tone myself. I have a western European heritage, so it makes sense. I remember when I was working and a drug rep came in and said, “Wow, you look amazing in that colour!” I was wearing a blue-based red. I always knew red looked good on me, but I had no idea it was that striking. Then I noticed my skin tone and understood instantly. Red is my favourite colour to wear. Other colours that look good are navy blue, black, cobalt blue, true purple, hot pink, and pure white. Your veins should have a blue hue, and your hair will have a cool tone to it as well, such as black, other dark colours, and even platinum blonde. Silver tends to look better on us rather than gold. Pastels do not jive too well on us either.

Spring Tones

20120831-125410.jpg

Spring girls all have golden or yellow undertones to their skin, and have red or golden undertones in their hair. Most have blue or green eyes of some sort. Bright, vivid, and clear colours work best on you ladies, such as sunshine yellow, creamy white, teal, spring green, lilac, and more. Dark, intense, and muted colours are not flattering either, and gold jewelry looks best.

Summer Tones

20120831-130159.jpg

All of you summer ladies should have blue or pink undertones to your skin, as well as more ashy type hair ranging from blonde to brunette., with no red or gold highlights. Blue, green, grey, hazel, and soft brown eye colours are common. What jewelry looks best? Anyone? Silver, that’s right, because of tour skin’s cool undertones. The colours that look best on you are cool. soft, dusty, and muted colours such as lilac, powder blue, dusty rose, mint green, and a soft grey. Try to avoid bold or rich colours.

Autumn Tones

20120831-130821.jpg

Autumn women have yellow or golden skin tones, consequently making gold jewelry match their skin better. Their hair ranges from red to brown, all with red or golden undertones, and their eyes are either golden brown, green, or dark blue. Spicy and earthy colours look best on you ladies. When you think of the fall, you tend to think of the colours changing on the trees and the abundance of colour that the earth is showing, all in spicy and golden tones. Those are the colours that look best for you: pumpkin orange, mustard yellow, ginger, peach, and cream. Avoid true pastels and bright colours.

What colours look best on you? What colours do you wish you could wear but they don’t go with your tone?

Necessary Tools for Great Vintage Makeup – Part Two

20120122-114657.jpg

Hi dolls!

Here is part two of my installment on necessary vintage makeup and tools. No introduction needed really, so let’s get started!

White Shadow Pencil

This is great for a lot of reasons. It helps to highlight your brow bone as well as the inner corners of your eyes to give you a more well-rested and awake look. You can also use this pencil to line the inside of your water line (lower lash line) to give you a more wide-eyed look which was very popular amongst Hollywood starlets and pinup girls. I use NYX pencil in Milk.

Rouge/Blush

Of course us vintage loving ladies need some nice colour on our cheeks! There are certain ways to apply rouge to achieve a vintage look based on a specific decade, but in general you blend into your cheekbones, using them as a guide as you blend up and outward toward your hairline. It is preferable to use a rosy or peach red blush for retro looks. I personally use a rouge, which is more of an authentic technique. Once I found Bésame’s rouge, I knew it would be the only one I would ever desire using 🙂

Eyebrow Pencil

I could not write this post and forget something as important as this! You will need to this to create the shape of your brow that you would like to achieve as well as fill in possible sparse areas. Be sure to get a colour that is about a shade lighter than your natural hair colour; getting the same colour as your hair will only make your eyebrows look entirely too severe and take away from your entire look. You will be adding a brow powder later to finish, anyway – so no worries!

Brow Powder

There are companies that have products specifically marketed as “brow powder”, but you don’t need that at all. Have I confused you yet? Well, stay with me on this – such “brow powder” is really nothing more than reassigned eye shadow. Do you have eye shadow in a colour about the same as your brow pencil? Then you are set! Just use your slanted eye brush to fill in your brows with it and to blend everything to a nice beautiful, natural finish.

Liquid Eyeliner

I love liquid eyeliner – it is all I ever really use for lining my eyes. You can create so many looks because of the liner tip (I prefer felt tip), from a thin barely there line to something more dramatic with a cat’s eye wing tip. The only colour you need is – what else – black! I use Maybelline’s Lash Stiletto because the tip is a decent length where you have a lot of versatility and the liner stays on a while, offering nice deep colour. This is essentially for rockabilly looks and to have a nice authentic vintage sex appeal.

Regular Pencil Eyeliner

I sometimes use pencil liner for a more demure look, and more often use some colour when I utilize this option (although of course I still have black as well!). I have navy blue and emerald green to make the colour pop in my eyes, since I have eyes with both colours in them. You can also use pencil liner for day and liquid for evening if you’d prefer.

Lengthening Mascara

Although it was nice to have volume in your lashes, the “gotta have it” quality in your mascara for retro makeup is length, length, length, and more length! I use the lengthening mascara again from Maybelline’s Lash Stilleto line. I also use Lancome’s Hypnôse mascara as well. Long luxurious lashes are something you will see on any Old Hollywood starlet. When you have nice long lashes, your eyes are automatically made bigger and brightened, making your eyes “pop”. Who wouldn’t want that? These ladies had it right! They don’t call it classic for nothing 🙂

False Eyelashes

No respectable starlet went to any event without a nice pair of false eyelashes on. It helps amplify your length as well as volume – the glamour, oh my! I bought a decent box of 6 pairs of Amazon for about $3, so it isn’t difficult to find some decent ones for a good price. I know She Uemera has some nice lashes (some rather, um, interesting…), but they are ridiculously expensive. You don’t need to shell out that type of money, trust me. You are mostly paying for a name there. But be sure to get some decent eyelash glue, please! Duo is the best brand in my personal opinion. You can find their glue at your local drugstore.

Eyelash Curler

Again, this is not something you need to put out big bucks for. They all do the same thing, so grab a cheap one at a local drugstore. I usually curl before and after applying mascara, just for some added oomph. Curl them in a pulsing hold, not a continuous hold – it helps to curl them better. It’s just another way to brighten and blow up those beautiful eyes!

Lip Liner

Since you will now be a lipstick aficionado, you must now also become a lip liner aficionado. This creates a “frame” for the lipstick to stay in, and helps maintain your colour better from fading. Lip liner is also imperative to drawing those lip lines and shapes of the era you desire. Every era from the ’20s through the ’60s had a special lip shape that was en vogue and sexy at the time (I will write a post about this in the near future), and lip liner helps to give you that general shape to fill with your lipstick. I use Bésame’s dual lip liner. I think all y’all know how much I love Bésame, so that’s all I have to say on that 😉

Lipstick

One of the most important parts of your makeup look will be red lipstick. It can intimidate some women, but wearing it just oozes classic sex appeal and confidence. This is an area where I would recommend not being cheap. A good quality red lipstick is very much worth it, and can really make or break your look. Of course, you know what I am going to say here, but it is so true, and it took me forever to find a really great lipstick – Bésame is the gold standard for us vintage loving ladies (and most ladies, it should be!) in terms of lipstick. They have a wide variety of red shades (as well as pinks, corals, browns, et cetera), so you should be able to find at least a couple of shades for you. The colour is very well pigmented and moisturizing, so using a lip brush will get you a little bit to go a long way, which makes the lipstick last forever! And the customer service has been fabulous to me. I know I go on about them (and no, I don’t get paid to plug them!), but honestly they are such a great company with great products – you won’t regret a purchase from them.

Finishing Powder

I never realized how much of a difference this would make until I used it! It really helps to set your makeup in place and soaks up any oil so that you will have a flawless and matte look. Just lightly brush all over your face, and then you are all set with your makeup! I can really notice a difference from when I use it compared to when I don’t.

And that’s about it! I know it may seem like a lot, but when you actually use all of these things, it doesn’t take that long. But it certainly looks fabulous!

In the past few days, with the support of my good friend Bunny Moreno, I have officially decided that I will dip my toes into the YouTube tutorial pool. I have a few ideas floating around in my head as to what my first video (my pilot, I guess you could say…? 😉 ) should be, so hopefully I will narrow it down in the next few days. When I finally do go for it, I will be sure to post it here for all of you to check out!

Necessary Tools for Great Vintage Makeup – Part One

20120119-195843.jpg

Hi dolls – sorry it has been a bit since I wrote last, I have just been ill recently with some sort of stomach bug or flu that has really taken me for a ride. I am finally starting to recover a bit, so numero uno on my to do list was to post for all of my fantastic readers!

Today’s post is the second part of my “Necessities” series – this time all about makeup. There are certain tools and products that are needed to help create an authentic vintage look like we are trying to achieve. Some are obvious; others, not so much. But never fear, that is why I am here! Sit back, relax, and take stock of what you currently own, and make a list of what you need to get.

Ready? Go!

Foundation Perfecting Base

You know how all of your favourite Hollywood starlets always had perfect skin, with seemingly no flaws? A foundation base will smooth out your skin and make it the perfect blank canvas to showcase your gorgeousness in all of its glory. My personal favourite to use is Smashbox’s perfecting base – it has tons of vitamins and minerals to help your skin in the longer term, and I find this base makes for the best results.

Concealer (Skin tone, Green, and Yellow)

Concealer is commonly used, but more often than not, too many people do not know how to properly use it or know the exact colours to use and where. I offered three basic colours for you to use, as I find they are the easiest to use and offer the best results. Yellow is used to cover under eye circles/darkness, and green is used to counter any redness you may have of your skin, as it is opposite of red on the colour wheel and would therefore be rather effective at neutralizing this undesirable tone. I use skin tone colours to cover any blemishes or anything of the like. I use concealers by either Physician’s Formula or NYX.

Liquid Foundation

Foundation is of course necessary, but why liquid, you ask? I prefer liquid to other forms of foundation due to the fact that its liquid-y nature makes it ideal to create more of a silky and airbrushed feel to your skin. Having as near perfect skin as you can is an essential ingredient to the vintage or pinup look. I use Revlon’s ColorStay foundation, because it offers great coverage with a matte finish, and I found a shade that matches my skin – amazing! 😉

Stippling Brush

This is the soulmate to the liquid foundation for flawless, airbrushed skin. You may scoff at the idea of a brush mattering that much, but trust me – beauty artists know the differences a brush can make! There is a certain way to use it to create that airbrushed effect through, where you speedily dab/dot the brush all over your face with the foundation on it until everything is blended in and no visible lines are showing. There are many tutorials on YouTube about how to properly “stipple”. I use a brush by a company called bdellium.

Eyeshadow Base

Don’t you hate those creases you get only a few hours after you put your eyeshadow on? Or are you having problems being able to blend or have any decent colour appear from your shadow? My prescription for you is some good eyeshadow base. Not only will it even out the natural colour of your lids (from veins, darker spots, et cetera), but it will get your shadow to work at its maximum level as well as stay put all day. Be sure to gently dab/pat it all over your eyelid, and keep your eyes closed for a minute or so to ensure it dries properly and completely. If not, then there was no point to even applying the base. I have oily lids, so without a base my shadow will last a maximum of maybe 45 minutes before almost entirely creased and smudged. I recommend Urban Decay’s Primer Potion.

Eyeshadow Palette

Every girl needs some choices. We like to have these choices 24/7, so it goes with makeup as well. That is why I believe every vintage going girl needs a good makeup palette that offers something for every mood and whim. I personally have two palettes, not just for my business, but also because I love myself some variety too! You can find tons of decent palettes on Amazon, which is where both of mine are from. They also have blushes, concealers, glosses, and more in them. I have the Coastal Scents’ 78 Palette (which is what I would recommend to start with) and NYX’s Beauty Box, although that is really for my business.

Makeup Brush Set

In the final check on the list for today’s partial post, I could not properly execute any of my makeup looks without a good brush in my hand, really. As I had mentioned beforehand in regards to the stippling foundation brush (I separated the two because 99.9% of brush sets do not include a stippling brush), brushes can make a big difference in helping you to achieve the looks you desire. Not all brushes are created equal. MAC brushes are the status quo for good brushes, but there are other good ones out there that I have found to be of nearly the same quality and much less pricey. I have a 13 piece brush set from Shany Cosmetics that I ordered from Amazon for less than $20 or $25. Brushes that I would not budge on requiring are: concealer brush, lash/brow brush, eyeliner brush (very thin tip), slanted eyeliner brush (angled shape – I use this for applying brow powder), blush brush, blending eyeshadow brush (bigger in that it seems as if the bristles are a bit bigger/more plentiful), regular eyeshadow brush (precision work, such as adding shadow in the crease), and a powder brush. Be sure to clean your brushes every week! Help them to help you.

Part Two of this post will be up as soon as possible, so keep your eyes peeled!