New Tattoo & Odds and Ends

Sorry for not posting for so long, but I have been extremely busy and still dealing with my friend’s death. I have decided that I probably want to go back into the military – probably the Marine Corps, and I have already visited a recruiter and just need a few more papers and to get medically cleared and I may be good to go. There is one other factour, but it’s not something I feel like should be discussed via such a public medium, so I hope you understand. I also checked into the Navy, and may join the Medical Corps, for obvious reasons. I don’t want to waste my education, you know? Yes, I could always finish school later, but why not have the Navy pay for it and when I get out I will be good to go, and feel good about having gotten back into the military like I have wanted for years, but have been feeling more of a yearning for since my buddy’s brother’s death. I told the Navy recruiter I want to work in the FMF, with the Marines – no debate, no discussion there. She understands, and is a badass b*tch that I feel like I can trust will work to get me what I want and really, essentially, NEED 🙂

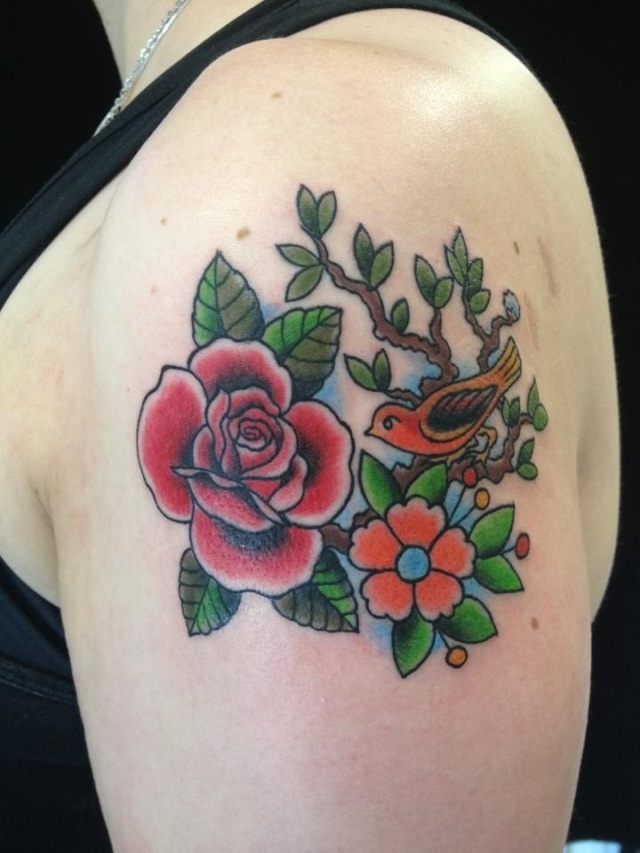
So, now, on to new business. I have a new tattoo, y’all! It was one I had wanted for years, ever since I got out of the Corps. I researched and researched, and found Supernova Tattoo. Leo “Bulldog” greeted me as soon as I walked in, and this place is just super rad – rockabilly music playing over the loud speaker, Japanese art pieces all over the place, and amazing tattoo art plastered on the walls made by the those who worked there. I had shown Leo a picture of a general idea of what I wanted, but explained some specific differences I wanted for it to fit my ideal piece.

Image

So Leo drew up the general idea, and showed me. It was perfect! I did not alter anything in his drawing, and he plastered the stenciling on.

It took an hour and a half to get it all done. The entire time Leo and I were just chatting up about rockabilly – we both love it, and were talking about Viva Las Vegas, and how we love Johnny Cash. We were talking about how much we hate stupid people, love tattoos, and about martial arts (he’s involved, and I know MCMAP – which isn’t really martial arts, but whatever…). I felt super comfortable and didn’t really feel a thing on my arm, and was either totally agreeing with Leo on something, laughing, or whatever. I was actually sad that it was all over, and wanted to say to Leo, “Yo, dude, tat me up more, this shit has been awesome.”

And here it is, the final product!

20130609-175753.jpg

It is really scanning up right now, and is rather gnarly looking. I almost don’t wanna show it off, but I just love it too much 🙂

What do all y’all think?!

Vote for My Next Bettie Bang Hair Colour!

Hello hello to all my lovely readers. I have really been trying to force myself to write a bunch of posts lately and take some snaps of my huge thrifting trip (yet again, I know) yesterday but I have just been feeling as low as your can nearly get because I do believe I am coming down with the flu that has been going around. Lucky me! And ironic indeed as well as just my luck, as I was unable to receive a flu shot recently because I was taking a special steroid for the pinched nerve/herniated disc in my neck and getting vaccines during the course of that treatment is a no-no. So I missed out and intended to get one this week, but here we are. What impeccable timing.

Anywhos, on to the topic at hand – hair! I have been itching to yet again change my hair colour on my Bettie bangs and am just torn between two wonderful colours. Since I just cannot bring myself to a decision, I am opening up that decision to you! I have entered a poll below for all of you to easily vote on what colour you would think would look best and prefer to see next on my Bettie bangs. I have the black hair besides so keep that in mind too!

Here are the options:

Atomic Turquoise

Atomic Turquoise

Hot Pink

Hot Pink

Go for it and let me know.

Thank you all for your help!

Easy Breezy Beautiful ’40s Half Moon Nails

I apologize for being missing in action for a bit, I just got my cat spayed and I feel like such a bad furbaby mommy! I know it’s the best for them, but it’s just hard to see my little stinky in a cone collar and all cut into having had surgery 😦 I am trying to make sure she just relaxes and rests so she can not rip open her incision and heal. I let her sleep where she wants, and I have been giving her special treats to eat, and I still feel bad! LOL.

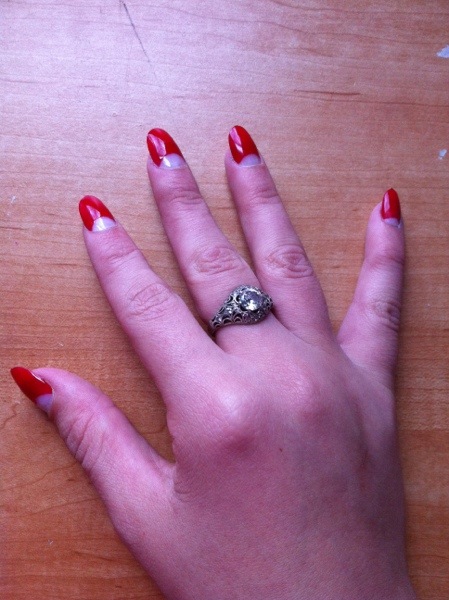
20121112-170324.jpg

I decided it was high time for a tutorial! I figured out a great way to do my nails in the gorgeous 1940s half moon style that so many of us love. Since this look does not look so swell on short nails, I haven’t been able to pull it off on my natural nails that just decide to say a big screw you and break off before they get any longer than about 2-3 millimeters. So I figured out a way to get the look without the natural length, and to have it look professionally done (without the price!).

Lets see what we are dealing with here:

20121112-171242.jpg

Looks great, huh?!

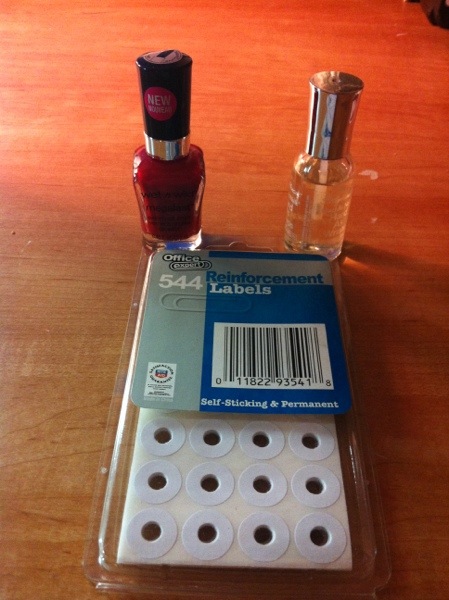
Here is what you need to get started:

-Undecorated full cover glue on nail kit (There is a Kiss brand available at most drug stores like CVS that offers a good rounded vintage-like shape, see below)
-Red nail polish (or colour of your choice)
-Top coat polish
-Hole punch reinforcer stickers (see below)
-Nail file
-Nail glue

20121112-172514.jpg

20121112-172647.jpg

1. Open your nail kit and measure each nail size to yours for an adequate fit. Place them to the side.

2. Take out your reinforcers and attach them to the bottom of each nail, taking in account for each nail’s size and what size of half moon looks proper. Each nail should look like this:

20121113-121702.jpg

3. Take your red nail polish and start painting each nail, just going slightly below the sticker line but never touching further below. When you paint, start with a soaked brush from the middle and then work out to each side – this helps the polish to look even.

Your nail(s) should look like this:

20121113-122647.jpg

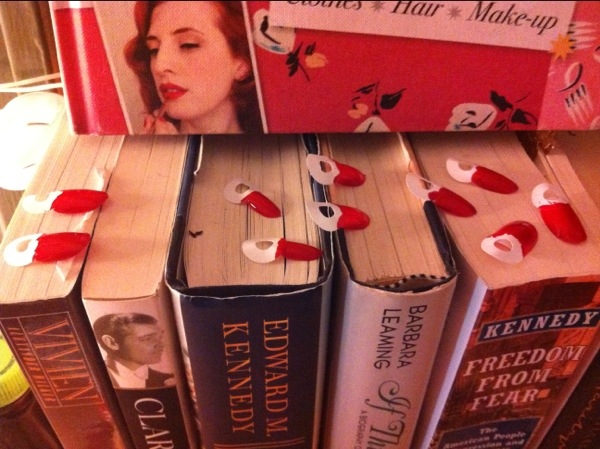
4. After you have completed this step on each nail, put them off to the side in a place that they will not be disturbed and let them cool for at least an hour or two. The drier, the better. I waited six hours with mine. The beauty is they are not on your nails yet so you don’t have to be terrified of fudging them up!

I put mine on top of some books I had on my desk so my cat wouldn’t get them:

20121113-123115.jpg

After waiting a proper time…

5. Make sure your nails are DRY. You are going to be taking the stickers off now, and any residual tackiness will mess up the half moon you are looking to achieve.

When you are taking the stickers off, be sure to pull them off from the bottom of the nail up to the top, NOT from side to side. This allows for a cleaner line.

6. Take another bunch of reinforcement stickers and put them on the back of the nail just like they were on the front, like this:

20121113-123635.jpg

7. Hold your nails by the sticker as I have done in the last pic. Take your top coat now and start putting it on top of each nail just like when you put the polish on. After you are done, return them to their drying place for another couple of hours.

8. Check to make sure the nails are completely dry after a few hours. If they are, take the reinforcement stickers off of them. Get your nail glue and begin to glue them on, applying the glue to the back of the nail and sliding it down to the base so it gets adequately bonded and covered to your nail.

After you have finished that, then you are really finished! They look pretty good huh? I intend to do this on most of my manicures now, and my nail kit comes with 10 sets of nails, so I have 9 more to work on 😉

I hope this works as well for you as it did for me!

To Dye For

Are you looking to add some spunk to your hair? So am I!

For the past few months, I have been putting all sorts of strange colours in my hair, and I love it. I have gotten nothing but amazing compliments since I started, and I relish being so unique and apart from the others. At first I went subtle with two strips of red in the under layers of my hair; but now I have graduated to the full show, dying my bangs and the adjacent strips of hair turquoise. I am proud to be totally different from anyone around, and to stand out in such a unique and individual way.

But how do I get my hair my teal colour? Today is the day I spill my secrets!

Dying your hair a unique shade can be a bit laborious, but the results are stunning. You need to bleach your hair at least once, if not twice. If you do need to bleach twice, please space out the time and deep condition after each time. I dyed my hair a platinum blonde in 2010 and I bleached it twice in the span of a few hours. Needless to say, my hair was breaking off in clumps! But if you remember to space it out and deep condition afterwards, you’ll be golden (literally). Learn from my mistake!

Also, you may encounter some brassiness, which is common. In order to avoid this, I recommend using a product called Red Gold Corrector Plus by Ardell. They have a powder form as well as the drops, which I use. When you deposit it into the bleach, make sure you get it to be a eggplant purple colour. And NO, it will not dye your hair purple! If you look at the colour wheel, you will notice that yellow/orange is exactly opposite of purple – the purple then helps to cancel out these tones. There is a science behind all of it!

Also, make sure you do your research when you pick up your developer. I use a 40 developer, since most of the hair I bleach is near my roots and healthy with no colour, and I can bleach it once and be good to go. However, if you have damaged or dry hair, I would go with the lowest level developer as possible. I would say to ask your stylist or a knowledgable worker at your local beauty supply store for help deciding which level you should go with. I also just dye a section of my hair not only for the cool look of it, but also to not have all of my hair fried to bits! Keeping it at small sections like I do minimizes damage to your entire hair.

After allowing your freshly bleached hair to dry, next is to apply your Adore hair colour. I have used Adore on my hair since I started putting unnatural colours in it, and it is a fabulous dye that lasts a long time before needing a touch up. It is also vegetable based, so it is great for rehydrating your hair after the bleaching; my hair is always silky soft after using this dye. And they have quite the range of colours as well!

20120924-163330.jpg

20120924-163715.jpg

They have even more colours besides these! I currently am using 112 Aquamarine, which is a rather self descriptive name LOL.

What you need to do is apply the dye rather generously, and wrap the hair soaking in dye with plastic of some sort. I have used saran wrap as well as plastic shopping bags for this, so there is no need to go on an all out hunt for some professional wrap. The directions say to let it sit for 15 minutes and use heat, but since this is a vegetable dye you can leave it longer. I leave it for about 30 to 45 minutes, and I blow dry it for about 10 minutes. After that, just wash out (no shampoo or conditioner), and you are set!

Your hair will have a great vibrant colour for a good while. I went two plus months before I needed to reapply, and even then it wasn’t horribly faded. Adore costs about $4 in beauty supply stores (not at Sally’s), and the amount will last for a while as well. It is a great investment for some great looking hair!

Dressing for Your Skintone

Ever notice how great you look in one colour but not another? Is there one colour that whenever you wear it you get noticed and complimented more? There’s a reason that is so: certain colours look best with your skintone. But how is a girl to know? Well I’m here to tell you!

The most important thing to knowing what colours look best on you is what type of skin tone you have. The best way to go about this is to look at the inside of your wrist – if your veins have a bluish tint, you have a “cooler” skin tone; if your veins have more of a green tint, then you have a “warmer” skin tone. Also, if you have a pinkish base or undertone to your skin, then you are cool also. A warm skin tone tends to have a yellow undertone. These are the basics you need to know in order to find colours that look best on you. There are also sub divisions being spring, summer, autumn, and winter tones which we will cover. Once you figure out your tone, look for it below and read on!

Winter Tones

20120831-130838.jpg

I have a winter tone myself. I have a western European heritage, so it makes sense. I remember when I was working and a drug rep came in and said, “Wow, you look amazing in that colour!” I was wearing a blue-based red. I always knew red looked good on me, but I had no idea it was that striking. Then I noticed my skin tone and understood instantly. Red is my favourite colour to wear. Other colours that look good are navy blue, black, cobalt blue, true purple, hot pink, and pure white. Your veins should have a blue hue, and your hair will have a cool tone to it as well, such as black, other dark colours, and even platinum blonde. Silver tends to look better on us rather than gold. Pastels do not jive too well on us either.

Spring Tones

20120831-125410.jpg

Spring girls all have golden or yellow undertones to their skin, and have red or golden undertones in their hair. Most have blue or green eyes of some sort. Bright, vivid, and clear colours work best on you ladies, such as sunshine yellow, creamy white, teal, spring green, lilac, and more. Dark, intense, and muted colours are not flattering either, and gold jewelry looks best.

Summer Tones

20120831-130159.jpg

All of you summer ladies should have blue or pink undertones to your skin, as well as more ashy type hair ranging from blonde to brunette., with no red or gold highlights. Blue, green, grey, hazel, and soft brown eye colours are common. What jewelry looks best? Anyone? Silver, that’s right, because of tour skin’s cool undertones. The colours that look best on you are cool. soft, dusty, and muted colours such as lilac, powder blue, dusty rose, mint green, and a soft grey. Try to avoid bold or rich colours.

Autumn Tones

20120831-130821.jpg

Autumn women have yellow or golden skin tones, consequently making gold jewelry match their skin better. Their hair ranges from red to brown, all with red or golden undertones, and their eyes are either golden brown, green, or dark blue. Spicy and earthy colours look best on you ladies. When you think of the fall, you tend to think of the colours changing on the trees and the abundance of colour that the earth is showing, all in spicy and golden tones. Those are the colours that look best for you: pumpkin orange, mustard yellow, ginger, peach, and cream. Avoid true pastels and bright colours.

What colours look best on you? What colours do you wish you could wear but they don’t go with your tone?